A full-featured chord/scale/progression calculator/player
ChordCalculus (CC) is a tool for players of fretted instruments. CC will allow the user to choose from a large number of pre-defined fretted instruments in a variety of tunings. Additionally, the user can define new instruments and/or tunings. Single or multiple capos can be added. The user then picks from one of four operating modes using the segmented selectors at the center top of the display:
- (C)hord CalculatorShow all fingerings for chords for a given instrument/tuning, filters, capos, and fret span
- Chord (I)dentifierFor a given fingering, display all possible names for a chord
- (S)cale Display:For a key and scale type, display the scale, and play a two-octave scale
- (P)rogression Player:Display fingerings for a chord progression
In all cases, the chords can be played as a chord or arpeggio and the scale played back.
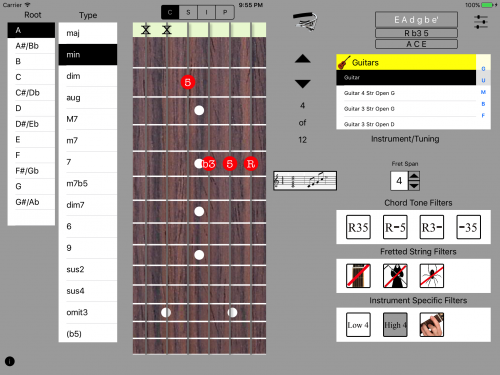
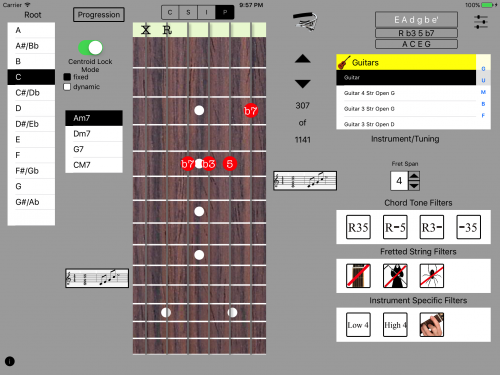
The user interface has three primary regions: the central instrument interface(green), the left chord theory area(violet) and the right fingering/filter area (blue).

The right “panel” has the Instrument/Tuning and and Filter Selectors. The Instrument selector is grouped into 5 families of instruments: (G)uitars, (M)andolins, (U)kuleles, (B)anjos and (F)olk Instruments. You can jump to the family by tapping the index on the right of the selector. Once selected, the central fretboard is set to reflect the instrument. Its tuning is displayed at the top of the right section. Tapping the tuning plays the notes of the instrument as an arpeggio. The next two displays below that are mode dependent and will be described below.
The Filter Selectors is most associated with the Chord Calculator mode. For example, there are over 1,500 valid ways to play an A minor chord on a guitar, but some may be physically challenging or sound too “open” or “closed”. The filters allow CC to reduce the number of chords displayed according to simple rules.
The top most section of the Filter selectors is associated with which notes of the primary chord triads (R 3 5) can be left out, where R is the root tone of the chord, 3 is its major or minor third and 5 is fifth (perfect, flatted or sharped) of the chord. As you add these filters, you will typically see more possible fingerings. Often in stringed instruments of four or less strings (mandolins, ukuleles, etc.), leaving out the root or fifth allows us to hear the essence of the chord (called chord partials). The left most button clears out these filters. They can also be toggled on/off individually
The next section has to do with chord fingering. From right to left, these are “no open”, “no dead” and “no widows”. No open means all strings must be fingered for a chord to be displayed. No dead means all strings must be sounded whether they are fingered or open. Lastly, no widows is a special case of no dead. It allows dead strings, but not when surrounded by two played notes. It eliminates the need to mute interior strings. As you add more of these filters, you will reduce the number of chords that are displayed.
The last region of instrument specific. For guitars, it forces either the high 4 or low 4 strings to be the only sounded strings.
These are often used in jazz chords. The barre chord filter will only show chords that can be played with a barre. For the mandolin, low 4 and high 4 are for jazz chords on the mandolin (“Jethro chords”). The double stop filter will show all double stop chord partials (played on two adjacent strings) in the chord.
A further “filter” is the span selector between the instrument and filter selectors. Span tries its best to display chords that have a fret span (top-most to bottom-most fret) shown. This can help for those with small hands or when minimal movement on the neck is desired. Each instrument has a default span.
The central section if the instrument interface. It includes an interactive fretboard, buttons to playback the notes of the chord as a strummed or arpeggio version, and a tool for adding capos to the neck. The interactions of the fretboard are mode dependent and will be described below.
The fretboard is interactive. It displays notes to be fingered as chord tones or notes on the fretboard over the appropriate string. If a string is played open, the note is labeled at the “nut”. If a string is not to be plays, a “X” appears on the nut. If capos are applied, labelling is placed on the capo as appropriate. In the various modes, tapping and swiping with change the way chords or notes are displayed. Note that the 5-string banjo is a little different in its layout.
The left section of a multi-purpose selector. Its functionality is mode dependent and will be described below.
Finally, in the upper right is a settings panel selector and in the low left is the button to display this help.
For all modes, you can add a capo to the neck. Tapping the capo button adds a full capo at the second fret. You can move the capo up and down by dragging it to the desired location. In some modes this will clear root/chord/scale selectors. To remove the capo, swipe it left or right.
For the guitar only, you can add multiple capos.

Tapping a capo brings up a selector to change the capo type allowing for various partial capos. For the 5-string banjo, there is a full capo for the primary strings and a single string capo for the fifth string. All modes take the capo into account. Fingering behind the capo is only possible for partial capos. If you want to remove all capos, swipe the capo button left or right
There are four modes of operation: Calc, Identify and Scale, and Progression. These are selected by the C, I, S, P selector at the top in the middle of the screen.
If in a given mode, more information is needed, the required parameter (the key, the instrument, the chord type, etc) label will “shake”. Under some circumstances, a popup will also inform the user of a required input.
Chord Calculator Mode: C
Select an instrument/tuning , a root (key) (left-most side) and a chord type, (second column on left), and all possible fingerings will be displayed on the fretboard. The chord tones of the selcted chord/key are displayed below the instruments tuning. The total number of chords for the current instrument/filter settings is displayed to between the instrument and filter sections.
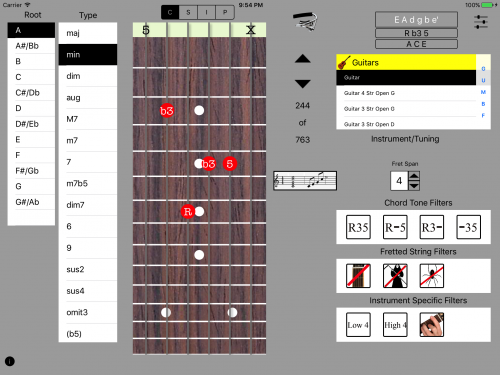
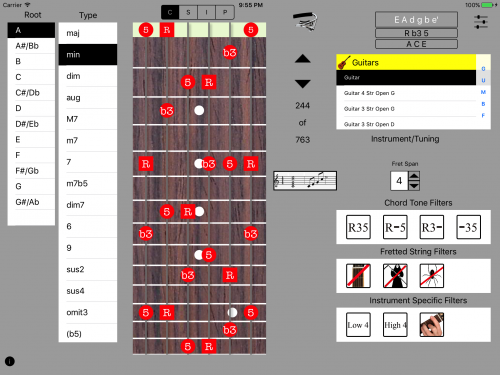
You cycle through all valid chords with the up and down arrows. Played notes are displayed in red and unplayed (dead) are labelled at the nut with an “X” at the nut or capo. If you swipe up or down the fretboard, it will “fast forward” the chords in proportion to the distance you swipe. If you swipe across, CC will find the chord closest to the fret across which you have swept. If no chords appear, the chord you have selected may not be able to be played on that instrument without abandoning one or more chord tones using the filters described above. If you tap the fretboard, it will display all of the chord tones on the entire fretboard. Tapping it again displays the current chord.
Hitting the chord/arpeggio button will play the chord. Hitting the arpeggio button will play the notes one by one. You can go the the Setting Panel (using the settings button) to control the speed of the chord and arpeggio as well as the volume of the playback.
Chord Identifier Mode: I
In identify mode, you touch the fingerboard to indicate a fingering.
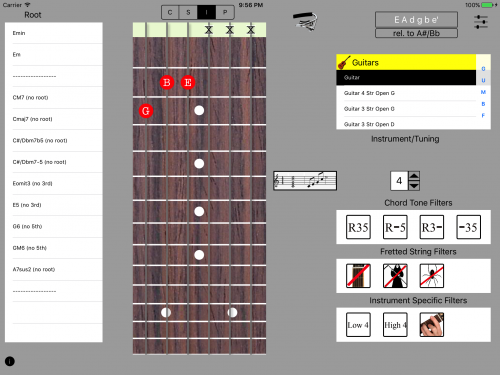
You can drag these up or down, or tap the selected string/fret to go back to being unplayed. As soon as a sufficient set or notes defining a chord or chord partial are entered, these are displayed on the left. A given fingering can have a variety of names, depending on which notes is thought of as the root. If its a chord partial the no 3rd or no 5 is included in the name. If you tap one of the “names” for the chord, all of its chord tones are displayed on the fretboad and the original notes in the query are circled. In this example, the Emin chord is selected.

Tapping the fretboard clears this “chord scale”.
Scale Display Mode: S
In scale mode, you select a key (the root) and the scale type (second column on left). All notes on the scale across the entire fretboard are displayed.

If you touch a root position, a two octave display is highlighted.
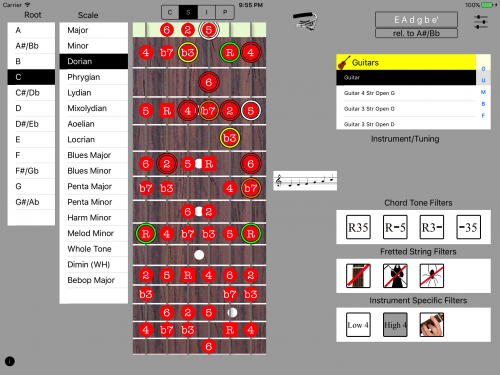
Hitting the scale button plays the scale. The speed/volume sliders are also effective here. If the mode is one of the greek modes, then the base key is displayed in the upper right hand corner (for example, A Aoelian is based on C Ionian (major), A Dorian is actually the key of G Ionian (major)). Every effort is made to have the appropriate anharmonics (sharps or flats) display based on the key signature (or for the greek modes, its base).
Progression Mode: P
Progression is derived from chord mod, so all filter/capos/span comments above apply. In progression mode, the user taps the progression key, a set of possible progressions are displayed
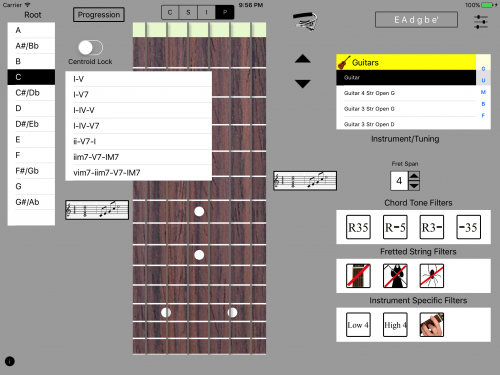
After choosing the progression, and a key, the chords or the progression are displayed in a selector list.
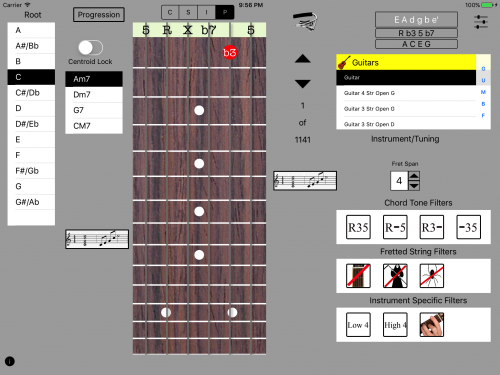
Selecting a chord will display all possible positions which the chords can be played at. All the same rules as in chord mode above apply. If any of the chords in the progression are not playable on the instrument with the current filters, a warning is displayed.
If the left playback buttons are tapped, then CC will cycle through the currently selected chord in each “fretboard” and play the chord at that position. The “Centroid Lock” switch
will play the first chord in the progression as displayed and then try to maintain the position on the neck on subsequent chords. The button “fixed” and “dynamic” set how the “centroid is used. Fixed will use the position ot the first chord. Dynamic will allow for motion up or down the neck form one chord to the neck, always trying to minimize such motion.
New progressions can be added using the Progression Editor (below)
Settings
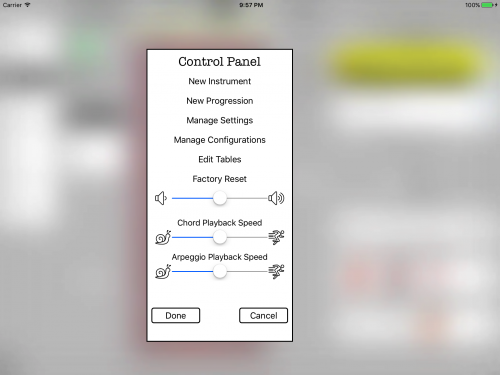
The button in the upper right activates the settings panel
- Instrument Editor
Hitting the New Instrument button brings up an instrument editor.
It will take the current selected instrument/tuning and allow you to adjust the tuning. You can then save this to the Instrument/tuning list. You will be forced to use a new name. The spinners allow you to change the tuning of each string individually. The boxes underneath are the “octave” of the note (read-only). The base octave of the instrument is added to this. So for example to create a octave mandolin, you could simply lower the base octave by one. You will also be requested to select its “voice” for playback, and which section of the instrument list it should be stored under. If you want to delete it later, you can edit the instrument/tuning list to remove it. To have this instrument saved for the next time you run chord calc, hit the “config” button to save it.
- Progression Editor
This utility allows the user to create new progression to add to the Progression List.
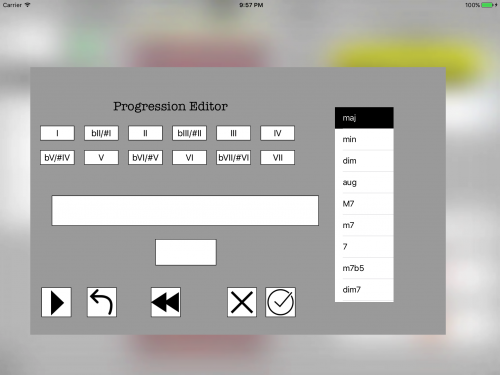
The buttons at top define the chord tone (I, II, II#/IIIb, etc.) of the next chord in the progression. The selector at the right sets the chord family for that chord. The displays at the bottom display the chord currently being entered and the larger display the progression. Note that the simple major and simple minor are represented only by the upper or lower case Roman numeral of the chord tone. All others include the chord name. The lowest set of buttons allow the user to: add chord, remove chord, clear all chords, abort operation and save the progression. The new progression appears at the bottom of the progression list. Its position can be adjusted by using the Edit Table Utility (see above) and can be saved using the Managing Configuration Utility (see above).
- Managing Settings
This utility allows the user to save the current instrument, filters and capos as a named entry in the “Settings” list. If an existing default setting is changed, the user is prompted to confirm the overwrite. There also the option to edit the list (delete rows/reorder).
- Managing Configurations
This utility allow the user to save the status of the instruments and progression lists. This allows added instruments or progressions to be retrieved as part of a named configuration. There also the option to edit the list (delete rows/reorder). Each configuration has its own uniquie set of Settings
- Editing the Tables
The labels of the editable tables are actually buttons that enable/disable deleting rows or re-ordering each editable table (currently the instrument/tuning and the progression lists). for the instrument list, you cannot move/delete the “basic” instrument. Also, you cannot move instruments between sections. If you wish to save this new “configuration”, you hit the “Config” button.
- Adjusting Playback
In the settings panel (activated in the upper right hand corner), there are three sliders to set the playback speed for chords and arpeggios. The third slider adjusts the playback volume
- Restore Factory Setting
If you feel the system has somehow corrupted the saved settings or configurations, this option will clear everything back to the default state first created at first startup.